
Cleaning Up Field Production Audio
We've all been there... you have a beautiful "looking" shot, but the location is in a "noisy" environment. "Back in the day", this meant you had to move your location to something more suitable for cleaner audio. (I guess if we're being honest, this is still preferable, but sometimes you are stuck with your location, and you just have to roll with it...)
So what are your options? For starters, mic placement is always important. You want to get your mic as close to your subject as you can, without being in the shot, if it’s a boom microphone. If your client doesn't mind a mic in the shot, you can use a lav and just place it as close to the upper chest as you can. Hyper-Cardiod mics work better in this situation than omni-directional mics too because of their respective pick up patterns. Another option is for you or your sound mixer to try using an attenuator in the field to attempt to clean up the signal a bit. We've had large amounts of success with this approach, but it's not a magic wand.
Now days, if you have the 'right' software, like Adobe Audition, for example, you can EASILY clean up that nasty background noise, to the point, it's no longer there! (...and do it rather quickly too!) This is why recording "room tone" is SO important! If you have 'room tone,' it's easy to make a "noise print" and remove it from your audio track. So what is the process, and how's it performed? For starters, you'll need to make certain that you get in the habit of recording the sound of your location. At the conclusion of your scene or interview, take thirty seconds to actually record the environment, with the mics still placed in the exact same location as when used during recording. Often you'll have to tell the
So what is the process, and how's it performed? For starters, you'll need to make certain that you get in the habit of recording the sound of your location. At the conclusion of your scene or interview, take thirty seconds to actually record the environment, with the mics still placed in the exact same location as when used during recording. Often you'll have to tell the
For starters, you'll need to make certain that you get in the habit of recording the sound of your location. At the conclusion of your scene or interview, take thirty seconds to actually record the environment, with the mics still placed in the exact same location as when used during recording. Often you'll have to tell the on air talent that you need thirty seconds of silence; most will comply. When you get back to ‘the office,’ edit the material as you normally would. My non-linear editor of choice is Adobe Premiere. [caption id="attachment_54623" align="
When you get back to ‘the office,’ edit the material as you normally would. My non-linear editor of choice is Adobe Premiere.
 For this demonstration, I’m using an actual clip, from an actual paid production, in which the subject was interviewed in a room a necessity. The individual is a scientist that is being awarded for a specific process that takes place in this particular laboratory. Therefore the background has been mandated to be this location. The client has informed us that there will be music playing under most of the piece as well.
This is what the interview sounded like in its natural state, as recorded.
 Once you have your footage cut the way you want it, you can sweeten the audio. If you have a particular clip that has some background noise you’d like to remove, hover your mouse/pointer over that clip and right click. You’ll notice that one of your options in the drop down menu is to “Edit Clip in Audition.” Select that option.

Unlink clips to delete unwanted audio tracks[/caption] One thing to remember, is that if you have several channels of audio and you only want a specific track/channel sweetened (because the others aren’t used, for example), you’ll need to “unlink” the clip first, then highlight the track/channel you’d like to send to Adobe Audition.
Once you choose “Edit Clip in Adobe Audition,” the program will automatically open. Premiere then bounces the clip to Audition for you. It will open for you and load the clip.  Audition opens Audition opens automatically from Premiere.
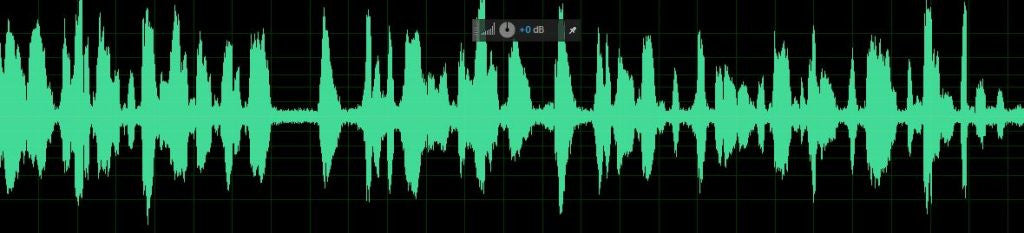
 You’ll see a visual representation of your audio, in the form of a waveform. The various parts that have spikes are your actual audio. You'll need to find about one full second (at a minimum, and more is better) of the 'noise' or unwanted sound you wish to remove.

In the image, you’ll notice that the “noise” is the smallest portion of the waveform. If you recorded “room tone”, you could use this process to highlight the noise in the room by using that specific clip and applying the data to your specific clip. The process is the same, save a particular step. In this instance, we have enough material where there is no other sound than the unwanted background noise, so we’ll use this clip.

Highlight the ‘background noise’ (lower wave forms) in your track within Audition. Then do a "Shift + P" to 'capture noise print.' (You can also use the menu: “Effects | Noise Reduction / Restoration | Capture Noise Print”)
 Select the entire audio clip.[/caption] Once the noise print has been captured, perform a select all, the entire clip to be cleaned. I typically use the keyboard shortcut “Control +A.” Once the entire clip has been selected, you need to open the Noise Reduction (process) window.
 I typically use the keyboard shortcut: "Control/Shift P". One can also use the menus: “Effects | Noise Reduction / Restoration | Noise Reduction (process…)
 This opens up the noise removal window. You can press play in the bottom left... It will play your audio. As you listen, notice there are two sliders, "noise reduction" and "reduce by." Slide these back and forth to see what you like and season to your personal taste. There is no ‘right or wrong’ here.
 I would start with Noise Reduction... get it where you like it, and then do the "reduce by." You might have to dance with them a bit.... you can leave in as little of the original offending sound as you want, or remove it entirely. Sometimes, you can get a "wow" effect that it sounds like your audio is being run through a guitar "wah-wah" pedal. You have to back things off if this happens.
 When you’re just starting out… you may have to play with the two main settings a bit to understand how they work.

There are some “advanced” settings, such as smoothing, precision factor and transition width. I typically run the spatial decay rate as 'high' as I can (settings from 0 - 100), without an 'echo' effect. Back it off slowly while playing back the clip, and you'll find the sweet spot. I’ve generally found that the other defaults work very well. In some instances, I have adjusted the other settings in small increments at a time to get the results I’m looking for.
 When you have it how you want it... select "apply." Then that window closes, and returns to the main clip window that shows the waveform. Once back in this main window, I typically use the keyboard shortcut: "control save" (control + s)
 (This is the cool part...) Audition SAVES the audio and then bounces the clip BACK to Premiere automatically and REPLACES the original audio clip! You’ll notice that the audio is now a different color than the original clip color.
 You’ll notice that the audio is now a different color than the original clip color.
 Save as Broadcast Wave File.[/caption] Often, I go back to Audition to 'export' the clip in the File menu as a broadcast Wave file as a backup too...
 You might be asking… “How do I use the room tone clip?” You have a few choices… either create a new sequence/timeline in Premiere and add only that particular clip. Then proceed with the process to get the clip into Audition. You could add that room tone clip to the end of your footage in the timeline and bounce it to Audition. Or you could open Audition and open that particular clip. I like the ‘lone sequence’ method, personally.
[ Highlight as much of the “room tone” as you see fit… generally one to a few seconds should suffice. Once selected, ‘capture noise print.’ At this point, I typically don’t work anymore on this particular clip.
 Audition will ‘save’ this noise print until you load another, or exit the program.
] You can also save your noise print as a 'preset' for use in the future, as well. This is very handy for on-going projects being shot in the same location with the same noise/sounds needing to be removed.
 Now, I return to Premiere and bounce the track I want to clean to Audition. Instead of capturing the noise print, I skip that step and go straight to the Noise Reduction Process phase: Control/Shift P. Then I manipulate the clip to my liking.
 Instead of capturing the noise print, I skip that step and go straight to the Noise Reduction Process phase: Control/Shift P. Then I manipulate the clip to my liking.

If I know that I have several clips to clean, I can now save the work as a preset and apply that to all other clips in my Premiere sequence/timeline.
A faster way to clean the audio is to select multiple tracks in Premiere and bounce them all to Audition at once. You can select entire tracks too! I’ve even bounced entire timelines (by nesting them) into Audition. Try getting creative, you’ll be surprised what works!
That's it... pretty simple! Start playing around! Listen for yourselves, what do YOU think?
This is a final representation of the clip in its natural state and then when we removed the background. (There is a dissolve between the two, so it’s not so abrupt.)
azPTP_AudioClean from Curt Pair on Vimeo.